Pages

Showing posts with label crafts. Show all posts

Wednesday, June 19, 2013

Crafts: Zachariah's Smash Cake Decor

The smash cake session for my nephew was beyond adorable. Here's what we did.


We used a silver plastic table cloth from Oriental Trading and hung it from a wall using masking tape, draping the cloth onto the floor to protect it from cake debris, and taping it to the floor as well. This was an awesome setup because after the smashing, all we had to do was remove the props and roll all the mess up and straight into the trash. Easy clean-up!


I found wood cut letters at walmart and used black spray paint around the edges and blue acrylic paint on the face to spell out his name and hung them from under the windowsill.


The piñata is hand cut from a cardboard box, covered with fringed tissue paper and 2 glue sticks worth of glue. The key to a sturdy piñata is to work with the shape of the box. I never cut the corner on the base where it attached to the front. Or the two side pieces on the bottom of the 1. After marking the piñata in 1 in bands all the way around, I alternated 2 strips of dark blue with 1 strip of light blue tissue paper and filled in any sparse areas. Since this was just a decorative piece and not an actually candy holding, hitting piñata, I didn't have to keep a fill hole. I did still add a loop of string in case we were to hang it somewhere.


Toss in 3 balloons of coordinating colors.


Crafts: Baby Shower Cupcakes and Cookies


 Custom made signs and cupcake picks. I made green and blue circles in Paint and added the text inside each circle. Printed off two copies of each circle onto 5x7" unlined index cards. Cut around each circle. Then glue them together so the front and back texts matched using non-toxic glue. The picks read: Little Boys? Snips and Snails & Puppy Dog Tails That's What They Are Made Of. I used ribbon from walmart to decorate the edge of the cupcake stand.


The Signs are in the same blue and green and were used on the food table. The clothesline sign was hung on the door to greet guests.


The same ribbon was used to tie shut the wrappers on the cookie pops.


Sunday, March 17, 2013

Rockin' 1st Birthday: Drums and Guitar


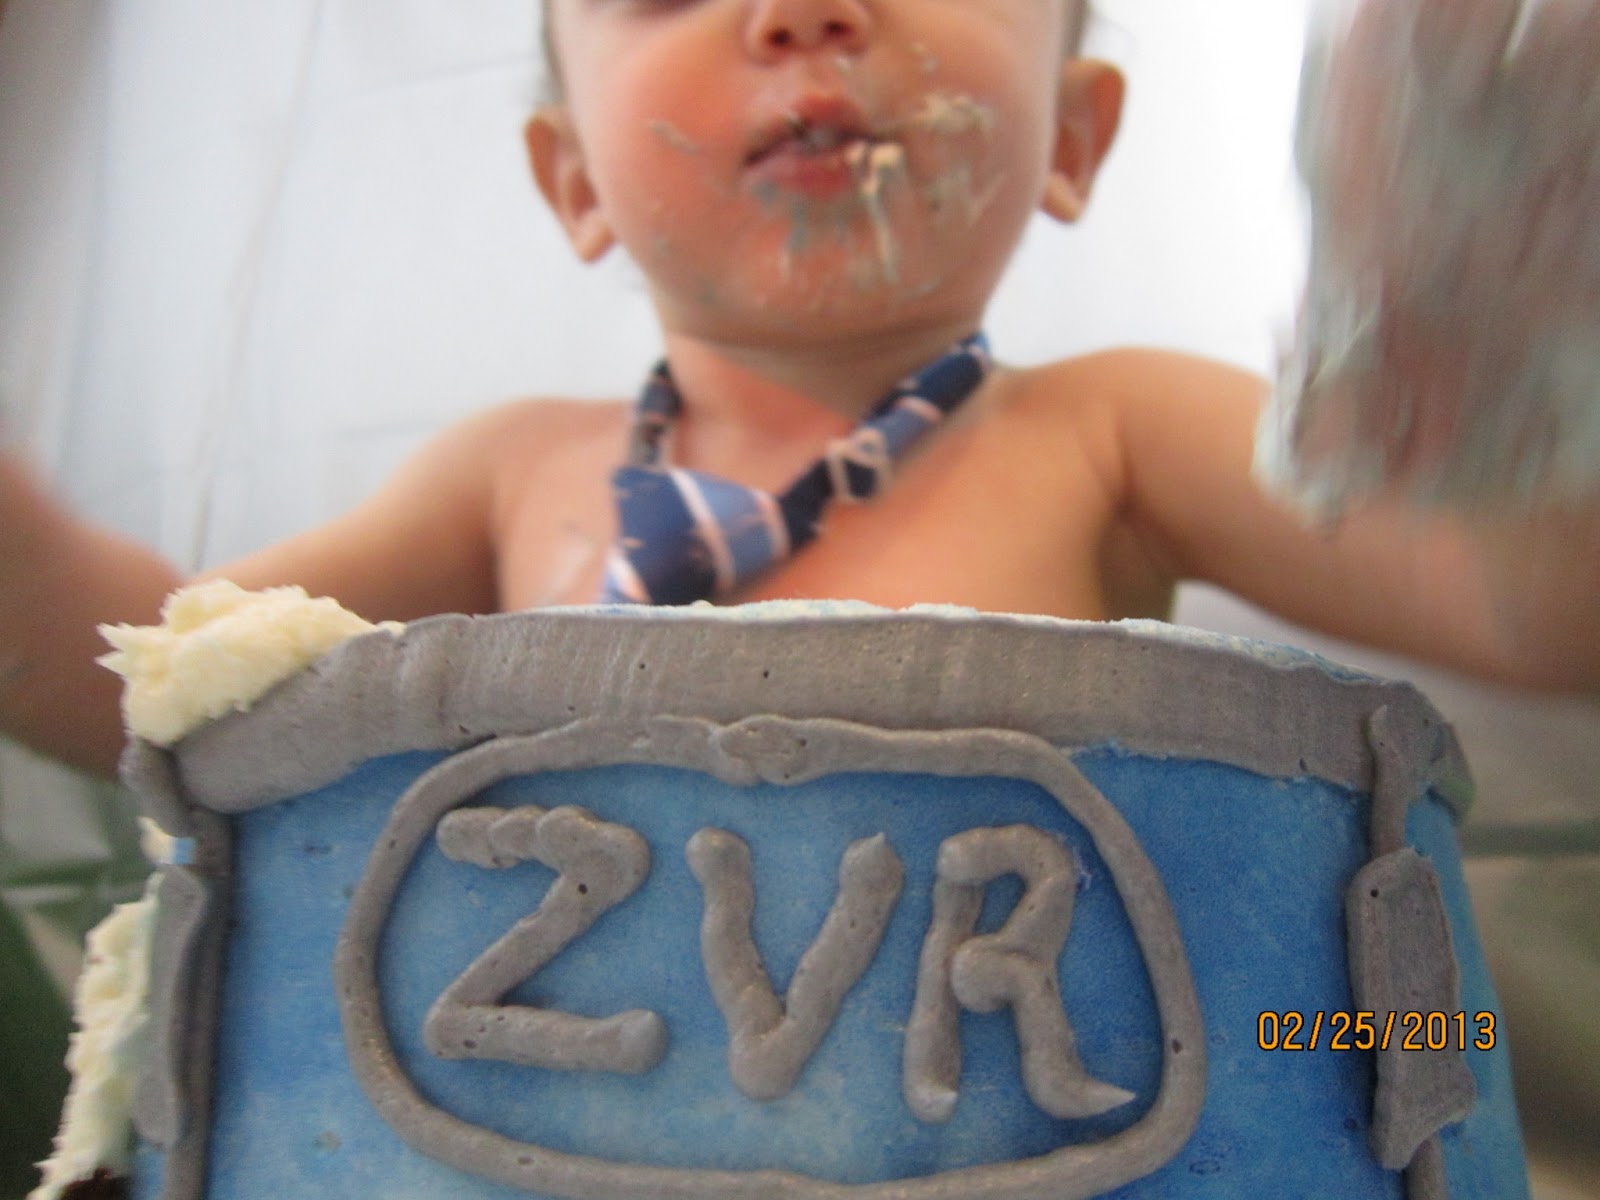
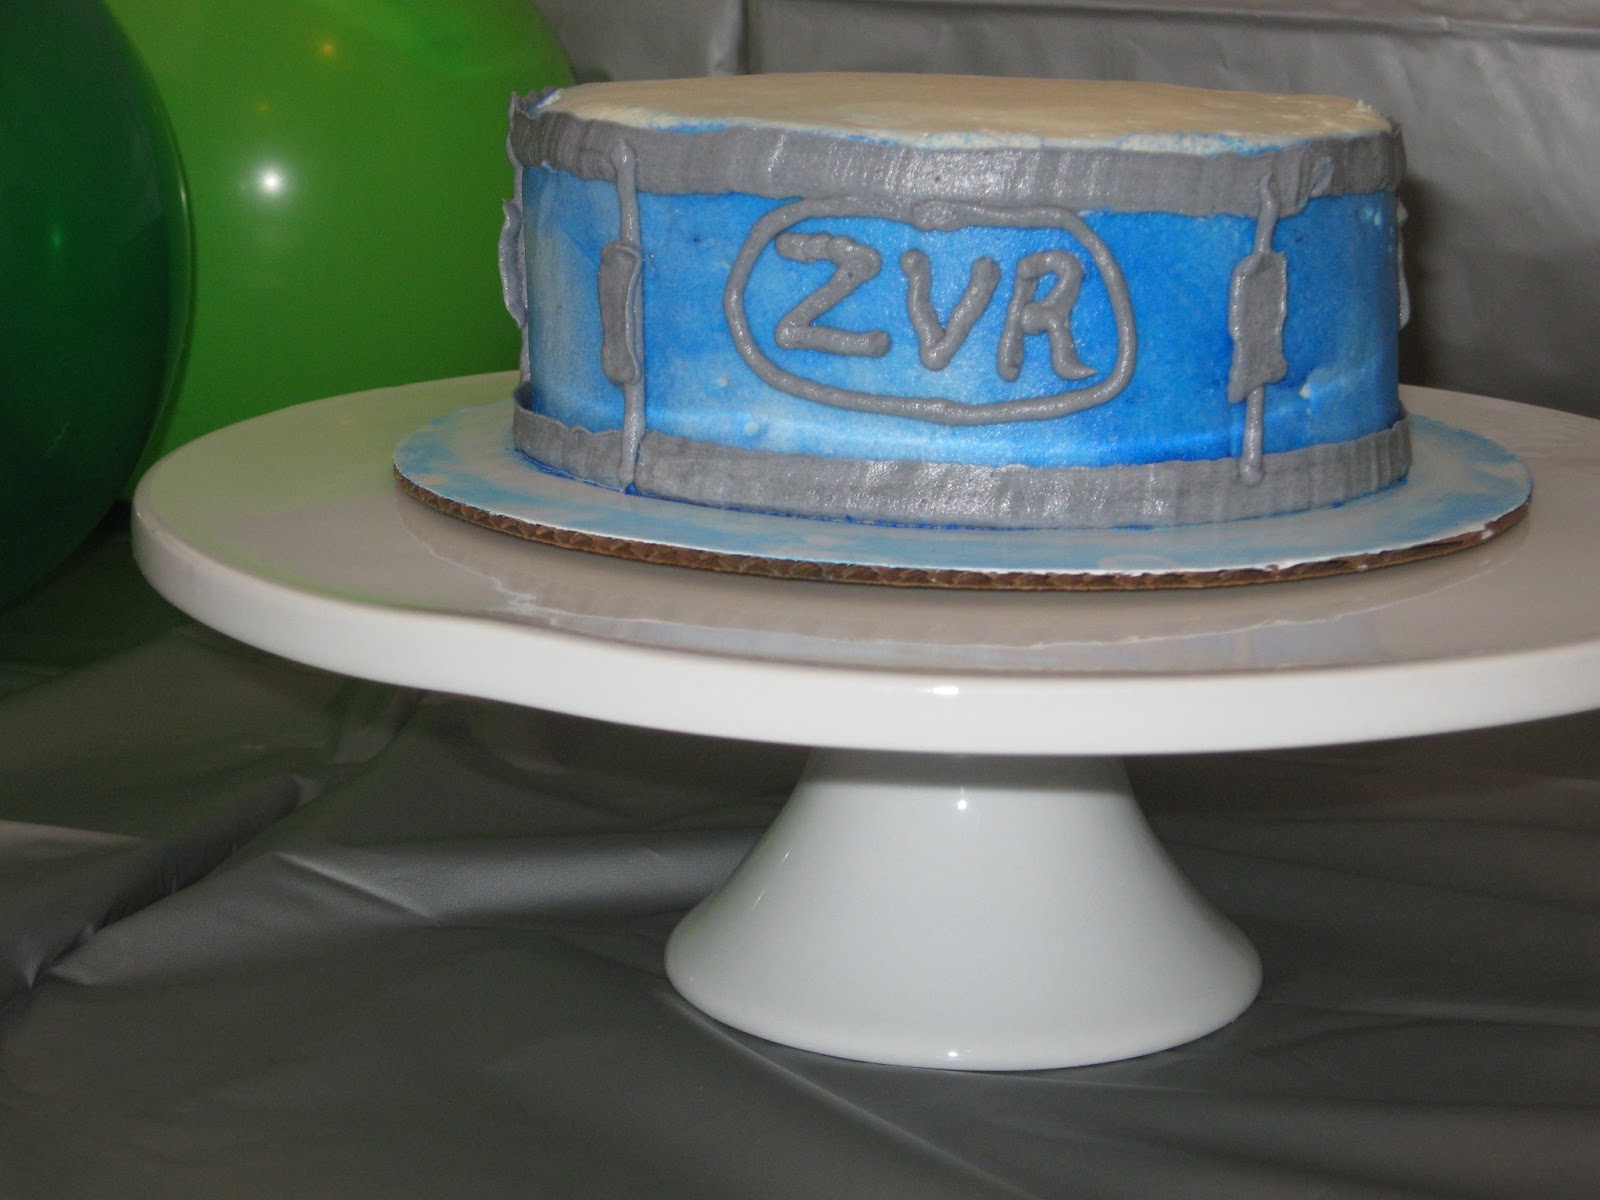
My nephew is turning 1! I'm more than thrilled to make his two birthday cakes, a chocolate electric guitar cake and a vanilla drum cake (8" round). These cakes are covered with buttercream.


Chocolate Cake 
1 1/4 cup sugar
3/4 cup butter, room temp
1 tsp vanilla
3 eggs
2 cups cake flour, sifted
1 tsp baking soda
1/2 tsp salt
1 cup milk
6 oz semi sweet chocolate baking bars, melted and cooled

In mixing bowl combine sugar, butter and vanilla. Add eggs and beat for 1 minute. Add melted chocolate. Add flour, baking soda and salt. Gradually add milk. Prep guitar pan with Wilton cake release. Bake for 30-35 minutes at 350 degrees. I rotate my pan after 20 minutes to ensure even baking. Cool to room temp on wire rack then move to fridge to chill before frosting.


Buttercream Frosting
6 cups powdered sugar
4 sticks (2 cups) room temperature butter
2 tsp clear vanilla extract
2-4 tbsp heavy whipping cream
food coloring as needed

Mix together butter and sugar in stand mixer for 3 minutes on medium. Add vanilla and cream and beat for another minute.


The electric guitar pattern calls for 1 1/2 cup white (thin 1 cup with 1 tbsp light corn syrup), 1 3/4 blue, 3/4 cup light blue, and 3/4 cup black.


Follow the directions and must frost in order. For the areas that are iced smooth, it is harder to smooth them over since you don't want to take a long pass and run the colors together, smooth it as best you can, let it lightly crust over (after a few minutes) then take a non textured/colored paper towel (Viva brand) and lightly press to smooth any stray frosting. 


Vanilla Cake
1 cup butter, softened
2-1/2 cups all purpose flour, sifted
1/2 tsp baking powder
1/2 tsp baking soda
1 tsp salt
1-1/2 cups sugar
2 large eggs
3 large egg yolks
2 tsp clear vanilla extract
1 cup buttermilk

Whisk together flour, baking soda, baking powder and salt. Cream together butter and sugar. Add eggs and yolks one at a time. Add vanilla. Alternatively beat in flour mixture and buttermilk, beginning and ending with the flour mixture until just combined. Divide batter between two 8x2" pans prepped with cake release and parchment cut to size. Baked at 350 degrees for 25 minutes. 


Buttercream Frosting
3 cups powdered sugar
2 sticks (1 cup) room temperature butter
1 tsp clear vanilla extract
2tbsp heavy whipping cream
food coloring as needed

Mix together butter and sugar in stand mixer for 3 minutes on medium. Add vanilla and cream and beat for another minute. I leveled and frosted the cakes with the buttercream then used Wilton food mist* in blue to spray the sides, while covering the top with a paper towel. *Be sure to cover your work surface with newspaper! Then used the leftover black from the guitar to add the details.

The drum was displayed on a cake stand with drumsticks sitting on the table. 


Monday, February 25, 2013

Zachariah's Smash Cake


I had a blast baking a smash cake for my nephew then capturing him in the process of smashing it. I used a box mix Duncan Hines Dark Chocolate Fudge (Since I knew it was going to be mostly smashed and trashed and not eaten). Prepped my 6" round pan with Cake Release and parchment, then scooped 3 cups of batter into pan. Baked at 350 degrees for 40 minutes. Invert pan onto cooling rack until room temp, then move to fridge. Use leftover batter for cupcakes. 


Buttercream Frosting
3 1/2 cups powdered sugar
3 sticks (1 1/2 cup) room temperature butter
1 tbsp clear vanilla extract
3 tbsp heavy whipping cream
 food coloring as needed. For the drum cake 6" I left most white, colored some gray. (Leftover frosting used to cover cupcakes).


Once the cake was chilled, I leveled it and frosted it with the buttercream, moved it back into fridge to set. Using a plain Viva paper towel, I gently placed it on the top and sides to smooth out any bumps or air bubbles. Laid the paper towel on top and used Color Mist* in blue to spray the sides. *Remember to protect the surface you are working on with newspaper to collect over-spray. I used the gray tinted frosting in a piping bag with a petal tip 102 to make the top and bottom borders. Next, I used tip 3 to pipe the vertical lines and tip 102 again to go over the lines. Piped his little initials on the front and called it a drum.

We set up the area in my kitchen with lots of windows, covered it with a plastic silver tablecloth, threw in a couple balloons, hung his name in letters from the window sill, a pinata that I made, and I got to use my new cake stand. Add baby; commence pictures.


 These I am going to put together into an album along with video we shot, set to happy birthday music. My sister is going to pick her favorite pic and they are also going to be used in the favor bags as thank you notes.


I can't wait to make his birthday cakes in a couple weeks for his actual party. They will be a larger drum cake and a guitar.


Precious, right?

Monday, December 26, 2011

Baby Shower Spice Cake Cupcakes

The second treat featured at the baby shower were these Spice Cake Cupcakes with Cream Cheese frosting, blue sugar crystals and cupcake picks. I used blank 4x6" index cards and created the circles and words in Microsoft Paint to make the cake picks. I printed them out in doubles, cut around each circle then glued them together with a toothpick in the middle.


I also created the signs for the treats and folded them in half. I did not get a chance to make fresh cinnamon buns-from-the-oven however, I was too exhausted from two days of baking and decorating to pull that off.


I used the 1M Wilton swirl technique with a 10" decorating bag and a star tip 195 (?). The cupcake stand is a cardboard, assemble yourself Wilton kit that I added some of the same It's a Boy! ribbon to with a hot glue gun.

I grouped the cake picks on each level of the cupcakes and voila!

Baby Shower Sugar Cookies

My sister had her baby shower at 23 weeks on December 1st. We decided to have it so early because she is due in March and didn't want to have people driving in the snow in January. I volunteered to do decorations and make the sweets. The baby's nickname is Sugar until she can pick a name for her little boy. The nursery is going to be guitar/rock 'n roll theme. So her best friend and I decided we would do sugar and spice and everything nice, snips and snails and puppy dog tails, and focus more on the boy theme of it. We also incorporated a playlist based around the sugar theme and Def Leppard's Pour Some Sugar on Me (since it is a baby shower for the mom) was our rock 'n roll choice.


My idea was already set around sugar cookies and some kind of spice cake. I had seen some baby onesie cookie cutters and the cookies were made into pops. I knew that would be fun! I used Betty Crocker sugar cookie mix (1 large and 1 small bag) to make 20 cookies total since we were unsure of a final head count. I used Wilton color flow mix and followed the directions for regular consistency and flow consistency. This was dyed blue with Wilton food coloring in royal blue. I used tip 1 for the outline and once the icing was thinned a used a larger petal tip to fill in and a toothpick to spread to all the edges.


I was going to add Baby and the snaps to the onesie once the color flow had dried but I had spent 8 hours working on these cookies and gave up. It took a lot of flour on the cutting board and rolling pin to keep from sticking. I rolled the dough out to 1/4", cut the shape, placed it on the cookie sheet with parchment paper, placed a stick 3/4 of the way up the length of the cookie, cut another and placed it on top. Make sure to get out any air bubbles between the layers and around the stick or your baby will look like it has a hernia.


Once the cookies had cooled enough to be iced, that was allowed to harden for a few hours. The next day I wrapped them in treat bags and tied a ribbon around them to tie them closed.


At the party we couldn't think of a cute way to display these so we just made a pile with a cute sign in front.


Aren't they adorable? They were a hit and since the turnout was small, everybody took some home with them.

Monday, October 24, 2011

NBX: Allie's Wedding Cake

My little sister got married this past week and I of course volunteered to make her cake. She searched the internet for a style she liked and came across this Nightmare Before Christmas themed cake and decided that it was the one. We have always said that would be her wedding cake theme because it is her favorite movie of all time (she played it so much I'm not sure the VHS still works). I didn't have a stand like the one shown, she didn't want names on it, just the stars, and the cake topper shown was, gulp, a $189 collector's item. So I tweaked it a bit and came up with a few designs stacking the cake, using a different cake topper, adding the stars differently. She like them but still wanted the layers to be separate so she suggested pillars of some sort. I found the globe pillars on Wilton's website, made up a final sketch for her and we both loved it. A design that she liked and it wasn't out of my skill level.

The final sketch:

There was a lot of shopping and planning ahead involved. My sister lives 2 hours away, so this meant I would be baking the cakes at my house, driving to her house and frosting/assembling them there to avoid melting and damage. I packed a huge box with all the tools I needed. I started baking cakes on Sunday night, then started the decorating Monday night and the wedding was Tuesday afternoon. The bottom and top tiers are Duncan Hines Dark Chocolate Fudge, middle tier is DH Classic White, all leveled and torted with DH Vanilla frosting. Cake pans were 3" high 12" 8" and 6" tiers. I used Wilton Sugar Sheets in black and dusted them with a mixture of matte purple and silver color dust using a dry paint brush. I measured and cut these into strips and affixed to the frosting. Next I cut the pillars to size with the globes and left the tiers separate to store in the fridge. I kept the bottom 2 wrapped on their plates with a small trash bag and the top tier (since it needed to stay the freshest to be preserved for their anniversary) in a cake keeper. I started this as soon as the baked cakes were cooled and rewrapped each layer until we got into the restaurant. The stars were all cut from white fondant 1/8" thick and threaded with floral wire. I left a few white and dusted a few with purple and silver color dust, or purple sparkling sugar. The cake topper was part of a collector's set but very inexpensive at just $15. Jack came in 9 pieces and Sally in 4 and these things were only a few inches high, kind of a pain to put together. The stars and cake topper were attached on site after the cake was assembled. I'm really loving the outcome, and congrats again to my sister!

The lovely couple and their cake.

Saturday, July 23, 2011

"Nichole"

A hobby I recently got into after making my first cake for my friend's wedding: cake baking and decorating! I somewhat served as her wedding planner/coordinator and cake baker. Since then requests have been coming in from her friends and family for birthday cakes and such. A few friends back home in KC are considering using me for their weddings next year. I even had another coworker ask me to make hers for her wedding. And so I did.


This is titled "Nichole" after the bride. Both cakes are marbled Classic White and Dark Chocolate Fudge with Creamy White/Vanilla Frosting by Duncan Hines. The ribbons were purchased by the bride, cut and hem-glued together by me. The sugar flowers were also purchased by the bride, from a company called fancyflours. I spray painted them with Wilton edible food coloring spray. The large cake measured 12" tall before the cake topper (also found by bride and ordered online). The pans used were Wilton 12", 10", 8", and 6" rounds. The smaller cake measured 6" tall and used Wilton pans 8" and 6". Each layer sits on a cardboard base and there are 2 skewers in the large and 1 skewer in the small cakes for support. The top layer of the large cake's cardboard base is wrapped in foil for preserving and I left a note with the instructions on how to cut the cake for serving and how to store the top layer for the 1st anniversary. The bride called just after her ceremony once she saw the cakes and said they were better than she had expected and more than perfect. I'm just so happy I could add this to my portfolio and possibly get a little side business started from it.