Pages

Wednesday, July 31, 2013

Mermaid

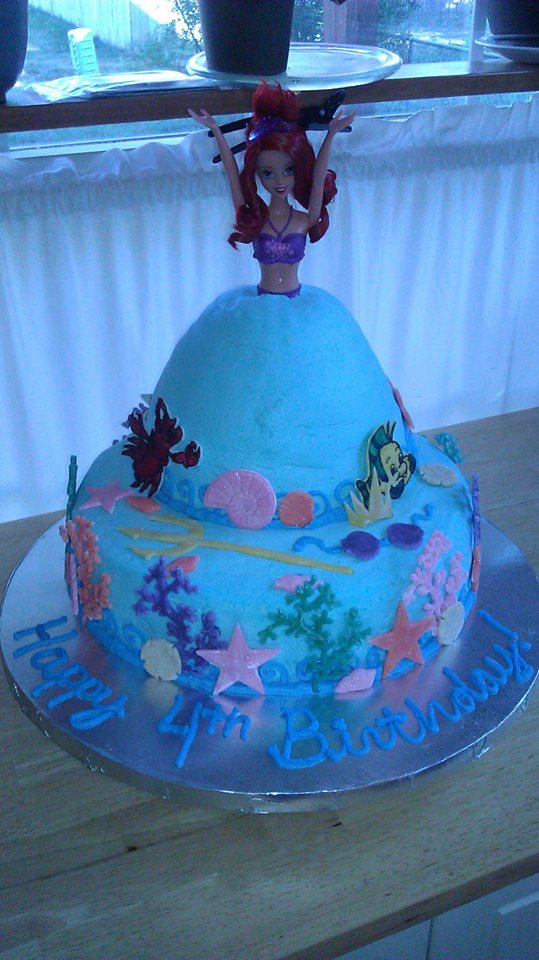
My cousin Jaiden turned 4 and wanted a Little Mermaid/under the sea themed party.


I used this under the sea mold for fondant using this idea and then this idea. Dusting the mold with cornstarch/powdered sugar mix, pressing the fondant into the mold, cutting off the extra fondant, repressing it, then flipping it out. I laid each piece on wax paper dusted with more cornstarch and powdered sugar, and let dry for 2 days to harden.


I had extra fondant and Jaiden told me that the cake needed a trident for the king when we were discussing her cake a few days before. I made a trident by rolling yellow fondant into a thin short rope. Then using a rolling pin, I rolled a small amount flat and used a sharp knife cut out the shape of the speared end. Laid the shape over the rope and used the rolling pin to roll everything flat and fuse the 2 pieces together. Then I cut out the king's crown shape and laid it on a curved bottle dusted with corn starch so it would have a rounded shape as it hardened. I dusted everything with pearl dust. White on the yellow, pink, and ivory fondant, green on the teal fondant, purple on the purple, and red on the coral fondant.


See that Flounder? I rolled out another thin sheet of fondant and using food writers, drew out the shape of Flounder by hand. Then I used a small paint brush and dipped it into a small amount of food gel into my palette, added a drop of color and used it to "paint" his light and dark blue stripes on. I could have (should have) used vodka instead of water, since the alcohol evaporates faster; it took a long time to dry. I also made a Sebastian and then Dory and Nemo. Under the sea right?

Detail. The king's trident and crown. Purple shells and a little piping makes Ariel's top. Sebastian and Flounder.
Top tier is chocolate cake. I used the wonder mold pan. I frosted it with a large piping bag and the frosting tip. After it crusted I used a viva paper towel and my hand to smooth out any bumps.


Bottom tier is yellow cake dyed sea green. Its a 12x3 inch round with the heating core.


I used a new frosting recipe that I learned in the Wilton class I'm taking, its too good to share!


Make sure to cut dowels to fit under your top tier. It supports your cake from collapsing and keeps it level. 

I piped on the dark blue water border instead of using the mold just because I was becoming impatient with the process. Used a dot of frosting to adhere the fondant to the cake after it has crusted.

A problem I ran into with using this Ariel doll I found for cheap at walmart, was that from her hips to the bottom of her feet was about 6 inches. The wonder mold pan yields cake that is only 5 inches tall. I had to cut a 2" hole in the bottom of the 8" cake board and thread her feet through the bottom. No biggie. After she was in, I piped her tail using tip 104, let down her hair and positioned her arms.


Disney/Pixar movies always have "Easter Eggs" in them so I thought it would be cute to sneak in Nemo and Dory on the back of the cake.


My sea creatures came out great! The cake was a hit at the party and Jaiden couldn't get over her Mermaid cake!


Hard to believe something that started this sketch came into reality.

Saturday, July 13, 2013

Things might get cheesy...

...when you make a rat cake?

I tried a new vanilla cake recipe since the last one somebody said tasted a bit "cornbread-y". I think it was the buttermilk. This cake is sweet! And light! And fluffy! I like it better and so do my taste-testers.


White Cake
2 cups baker's sugar
1 cup (2 sticks) room temp butter
1 tbsp + 1 tsp clear vanilla
4 eggs
3 cups cake flour
1 tbsp + 1 tsp baking powder
1 cup milk
pinch of salt

Preheat oven to 350 degrees, grease and flour 2 8" rounds. Cut parchment to size
Cream together butter and sugar until light and fluffy. Add vanilla. Beat in eggs one at a time. In a separate bowl, whisk together flour, baking powder and salt. Add flour mixture one cup at a time. Beat until combined. Slowly add milk. Divide batter between pans and bake for 35-40 minutes. Cool on cooling rack 20 minutes in pan before removing.


Buttercream
6 cups powdered sugar
2 cups (4 sticks) room temp butter
4 tsp clear vanilla
4 tbsp heavy whipping cream

Cream together butter and sugar, beat on medium for 3 minutes. Add vanilla until just combined. Add heavy whipping cream and beat until light and fluffy.


Wednesday, June 19, 2013

Crafts: Zachariah's Rockin' Party

If you are ever in need of custom guitar picks, I recommend this company to order from. The order shipped fast and there were 72 picks in the bag when I only ordered 60 for $32.99.

Template of the picks
Actual picks were a hit.


A few of the guitar picks were used in a jar to "Guess how many picks in the jar" as a game. I also hot glued extra strength magnets to the back of a few of them so we could play "Pin the pick on the guitar". The others were put in thank you cards for guests to keep.


Outline, freehand.


All acrylic paint, handpainted.


Pin the pick on the guitar was as blast, although the $9 magnetic spray paint was not worth it. We just used our fingers to hold the picks in place as we played. 

Crafts: Zachariah's Smash Cake Decor

The smash cake session for my nephew was beyond adorable. Here's what we did.


We used a silver plastic table cloth from Oriental Trading and hung it from a wall using masking tape, draping the cloth onto the floor to protect it from cake debris, and taping it to the floor as well. This was an awesome setup because after the smashing, all we had to do was remove the props and roll all the mess up and straight into the trash. Easy clean-up!


I found wood cut letters at walmart and used black spray paint around the edges and blue acrylic paint on the face to spell out his name and hung them from under the windowsill.


The piƱata is hand cut from a cardboard box, covered with fringed tissue paper and 2 glue sticks worth of glue. The key to a sturdy piƱata is to work with the shape of the box. I never cut the corner on the base where it attached to the front. Or the two side pieces on the bottom of the 1. After marking the piƱata in 1 in bands all the way around, I alternated 2 strips of dark blue with 1 strip of light blue tissue paper and filled in any sparse areas. Since this was just a decorative piece and not an actually candy holding, hitting piƱata, I didn't have to keep a fill hole. I did still add a loop of string in case we were to hang it somewhere.


Toss in 3 balloons of coordinating colors.


Crafts: Baby Shower Cupcakes and Cookies


 Custom made signs and cupcake picks. I made green and blue circles in Paint and added the text inside each circle. Printed off two copies of each circle onto 5x7" unlined index cards. Cut around each circle. Then glue them together so the front and back texts matched using non-toxic glue. The picks read: Little Boys? Snips and Snails & Puppy Dog Tails That's What They Are Made Of. I used ribbon from walmart to decorate the edge of the cupcake stand.


The Signs are in the same blue and green and were used on the food table. The clothesline sign was hung on the door to greet guests.


The same ribbon was used to tie shut the wrappers on the cookie pops.


Saturday, May 18, 2013

Logan's Graduation


Chocolate Cake 
2 1/2 cups sugar
1 1/2 cups butter, room temp
2 tsp vanilla
6 eggs
4 cups cake flour, sifted
2 tsp baking soda
1 tsp salt
2 cup milk
12 oz semi sweet chocolate baking bars, melted and cooled

In mixing bowl combine sugar, butter and vanilla. Add eggs and beat for 1 minute. Add melted chocolate. Add flour, baking soda and salt. Gradually add milk. Prep 11x15" sheet pan with Wilton cake release. Bake for 55-60 minutes at 325 degrees. I rotate my pan after 20 minutes to ensure even baking. Cool to room temp on wire rack then move to fridge to chill before frosting.


Buttercream Frosting
6 cups powdered sugar
4 sticks (2 cups) room temperature butter
2 tsp clear vanilla extract
2-4 tbsp heavy whipping cream
food coloring as needed

Mix together butter and sugar in stand mixer for 3 minutes on medium. Add vanilla and cream and beat for another minute. Divide and color. I used Delphinium Blue and Royal Blue mixed and Orange and Copper mixed to get the shades I used.

Buttercream transfer for the high school mascot. 

Saturday, April 20, 2013

How-to: Buttercream Transfers

Buttercream transfers are an easy way to add a design to your cakes by using an illustration, cartoon or coloring page and coloring them in with frosting. I use a full butter frosting as opposed to a butter/shortening mix because the butter freezes better and is like whipped ice cream. Make the frosting and divide and color as needed.

Buttercream Frosting
6 cups powdered sugar
4 sticks (2 cups) room temperature butter
4 tsp clear vanilla extract
4 tbsp heavy whipping cream
food coloring as needed.

Cream together butter and sugar. Beat for about 3 minutes until light and fluffy. Add vanilla, beat for 1 minute. Add heavy whipping cream, beat for 3 minutes, until fluffy.


First thing you need is to draw or print out your designs. You have to use a mirrored image of what you want on the cake because you flip it over.


Next cut out wax paper squares to fit over the image allowing 1-1.5 inches around image to handle the paper and apply tape.


Find some kind of flat surface like a cutting board, sheet pan, or in my case, 8" rounds, that fit into your freezer. I like that the pans are metal and conduct heat so they stay cooler longer while you pipe on them. I put my pans in the freezer first so when I start piping it doesn't move. Tape the image to the flat surface then tape the wax paper over it. 


So this part I missed, but you want to start with what is in the foreground of the image and pipe it first. Next do the outlines and fill in with frosting. Use a toothpick to maneuver the frosting into any tight corners. Go around the perimeter with the same frosting color as the background of your cake (prevents color bleeds). Then apply another layer of just the back ground color over the entire image. Place it in the freezer for 5 minutes. Pull it out and use a Viva paper towel (it doesn't have texture or inks) to smooth it level. Just place the paper towel over the frosting and smooth gently with your hand or a smoothing tool.  Place back in freezer for 15-20 minutes until hard. 


After the frosting hardens, flip the image onto the cake. If it is pliable, put it back in the freezer or else it won't stay on the cake and will stick to the paper.  Slowly peel off the wax paper.


At this point you can pipe any embellishments, add writing and pipe borders.