Pages

Showing posts with label recipe. Show all posts

Saturday, March 29, 2014

Marvin the Martian


Chocolate Cake 
3 cups + 2 tablespoons sugar
1 3/4 cups + 2 tablespoons butter, softened
2 1/2 teaspoons vanilla
8 eggs
5 cups flour
2 1/2 teaspoons baking soda
1 1/4 teaspoons salt
2 1/2 cups milk
15 ounces chocolate

In stand mixer, cream together sugar, butter and vanilla. Add eggs and beat for 1 minute. Add melted chocolate. Add flour, baking soda and salt mixture. Gradually add milk. In 11x15" sheet pan spray with oil, coat sides with cocoa powder and line with parchment paper. Bake for 35-40 minutes at 325 degrees. I rotate my pan after 20 minutes to ensure even baking. Cool to room temp on wire rack then move to fridge to chill before frosting.

Having a cake frosted and ready to decorate is like a blank canvas for an artist; it gets me pretty excited!

Sweet Buttercream
2 cups shortening
1 tsp clear vanilla extract
1/2 tsp butter flavor
1/2 tsp sweet almond flavor
24-26 tsp water
2 lb. powdered sugar
2 Tbsp meringue powder
pinch of salt

Cream shortening flavors and water. Add powdered sugar, meringue powder and salt. Beat on low until ingredients are combined then beat on medium speed until smooth and creamy.


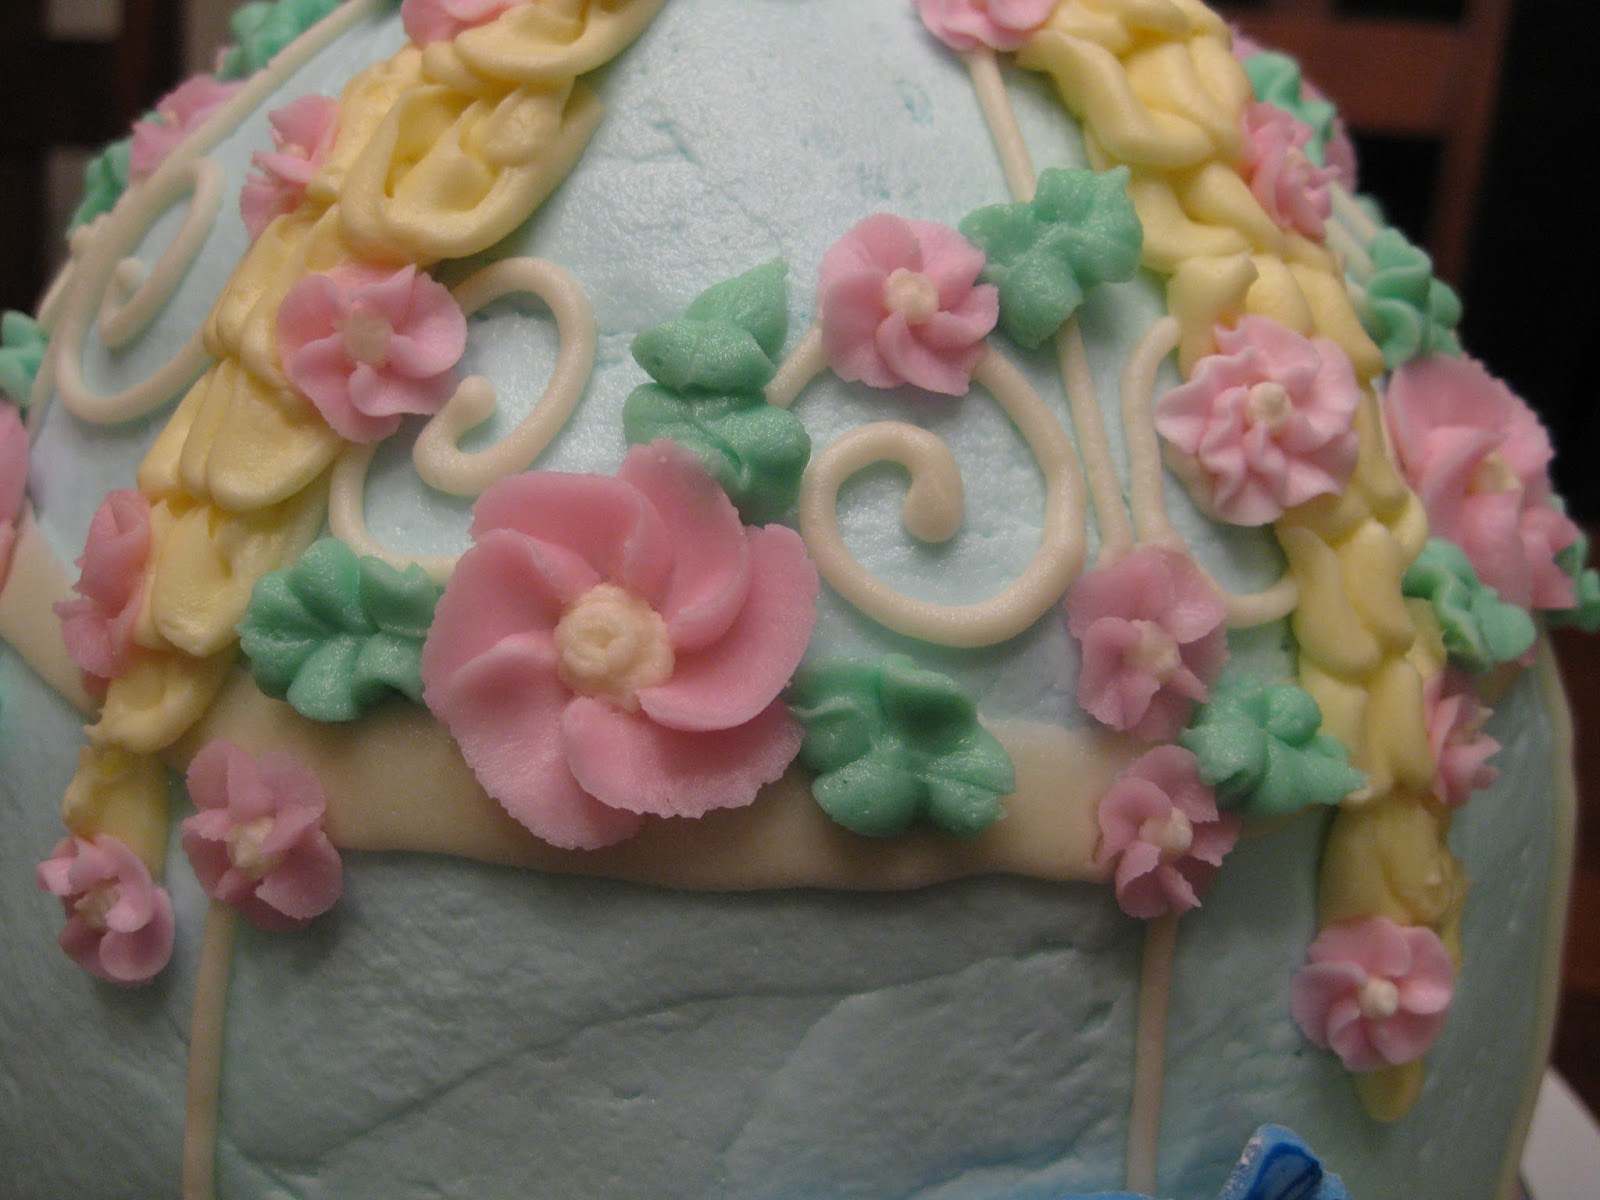
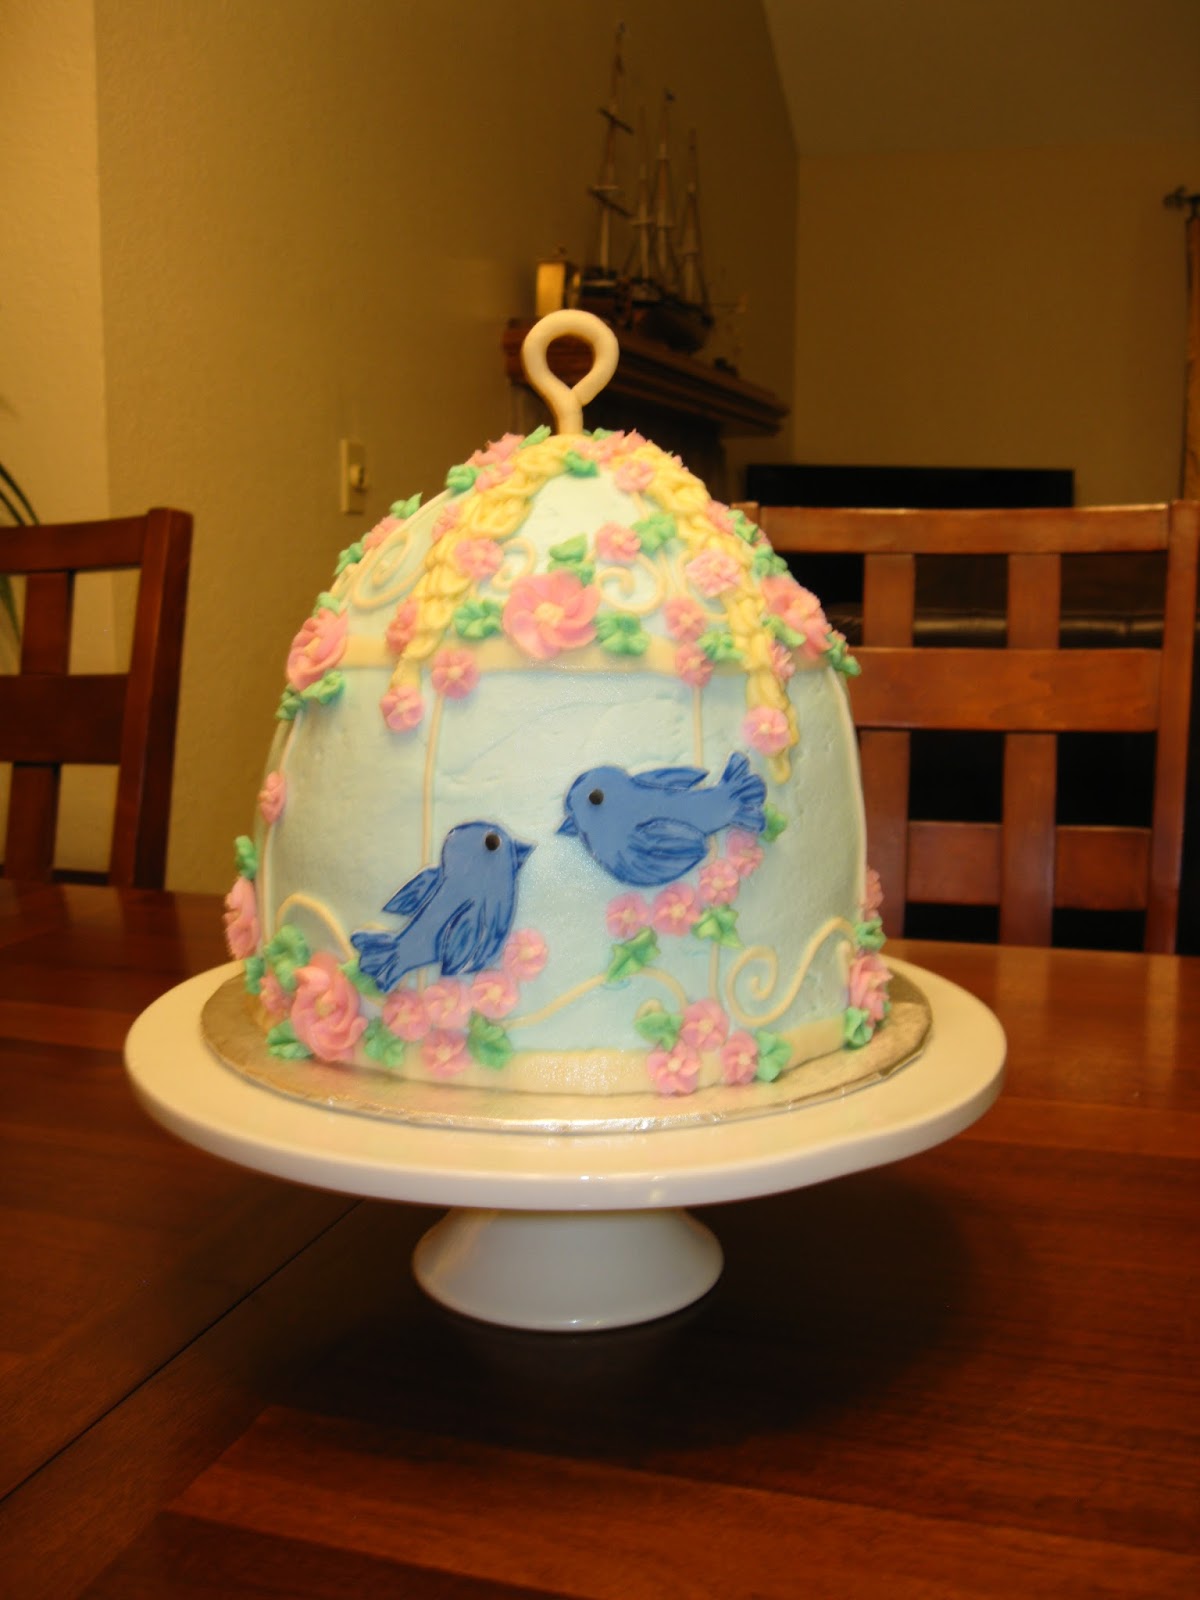
For the buttercream transfer, I used a reverse image taped to a clipboard and taped waxed paper over that. The I piped in the main colors: white, black, red, green blue, light and dark yellow. Then outlined the whole image in white and filled in the back so it was level. I put the clipboard in the freezer for about 10 minutes. Once the buttercream was somewhat hardened, I untaped the waxed paper, positioned it where I wanted it on the cake and flipped the buttercream over. Pressing down firmly to get the transfer to stick to the cake, I peeled back the waxed paper. Then I took black icing and a tip 1 and did the fine details and outlines. The hand, glove, brush, helmet, etc. were all outlined in black.


I love being able to do buttercream transfers so that the cake can match party decorations exactly. Any image can be replicated.

Hello Kitty Birthday


How fun! This cake by itself has no artificial color or flavor (especially if you use real vanilla in the buttercream as opposed to clear vanilla extract). The piping on top of course has artificial colors, but it's a healthy cake, if one can call cake healthy.

Fresh Strawberry Cake
24 oz strawberries, stems removed. = 3/4 cup strawberry puree
1-2 tsp sugar
1/4 cup milk
4 large eggs
1 Tbsp bourbon vanilla extract
2 1/4 cup cake flour, sifted
1 3/4 cup sugar
4 tsp baking powder
1 tsp salt
12 tbsp (1 1/2 sticks) unsalted butter, room temp.

Combine strawberries and 2 tsp sugar in blender to make puree. Reserve 3/4 cup. Refrigerate remaining puree.

In small bowl, combine puree, milk, egg, vanilla and mix with fork until well blended. In bowl of stand mixer, add sifted flour, sugar, baking powder and salt and mix to combine. Continue beating at slow speed and add butter. Mix until combined and resembling moist crumbs. (Very important to use the butter softened, it affects the texture).

Add liquids and beat at medium speed for about 1 minute or until full and evenly combined. Stop mixer to scrape down the sides of the bowl and hand beat for 30 more seconds.

Divide into 2, 8" rounds, greased and floured and with cut parchment. Bake 30 minutes at 350 degrees, rotating after 20 minutes. Cool in pans on wire rack 20 minutes then invert and continue to cool to room temp before moving racks into fridge to chill.


Strawberry Buttercream
1/2 cup (1 stick) butter, room temp
4 cups powdered sugar, sifted
2 tsp clear vanilla
1/4 cup mashed/pureed strawberries

Add all ingredients to bowl of stand mixer. Beat on medium until fluffy.

For Hello Kitty's face, I used a reverse image and piped clear piping gel onto waxed paper, then transferred the outline to the cake and pressed over the lines. Peel off the waxed paper then pipe in the colors.


Monday, February 24, 2014

Cherry Coke Cake


A Cherry Coke cake with Vanilla Coke buttercream and maraschino cherries. The cake is two layers, 8" round filled with more cherries. I followed this recipe  except that I used less coke and added vanilla to the buttercream.

Cherry Coke Cake
1 box chocolate cake mix
1 cup Coca-Cola
1/3 cup vegetable oil
1/4 cup maraschino cherry juice
3 large eggs

Preheat oven to 350 degrees. Prepare two 8" pans. Combine all ingredients in bowl of mixer. Pour into cake pans and bake for 35-40 minutes. Move to wire rack to cool.

Vanilla Coke Frosting
1/2 cup butter, room temp
3 cups powdered sugar
4 Tbsp Coca-Cola
1 Tbsp clear vanilla extract

Cream together butter and sugar. Add coke and vanilla. Beat until combined.

Thursday, November 7, 2013

Cake Batter Fudge

I borrowed this recipe from here after a friend came across it online. Had to try it since it looked so good! I followed the recipe exactly except that I used Cherry Chip cake mix instead of white or yellow. It tasted great! And I used up some of the many sprinkles/sequins/edible hearts/sparkling sugars that I have.


2 cups Cherry Chip cake mix
2 cups powdered sugar
1/2 cups (1 stick) butter cut into fourths
1/4 cup milk
1/2 cup white chocolate chips
1/4-1/2 cup sprinkles (and just like the recipe says, who measures sprinkles? Just to crazy!)

In a microwave safe bowl, combine cake mix and sugar. Add butter and milk. Microwave on high 2 minutes. Stir until combined. Add chocolate chips and stir again. Fold in half of sprinkles. Spread in to a greased or lined with parchment 8x8 pan. Add remaining sprinkles and press in. Refrigerate to set. Cut into 1 inch squares.


Tuesday, October 22, 2013

Rosenberg Wedding Cake

Ivory wedding cake with black scrolls and bead border. Four tiers: 6, 8, 10, 12" and two sheet cakes 11x15". Real red roses on top. Vanilla white cake with raspberry filling and vanilla buttercream. Since I used fresh flowers on this cake, I first set down 6" doilies, and piped a mound of buttercream. I placed the cut flowers into the mound and the vertical flowers I used flower spikes to insert them into the cake.

 I baked the cakes on Thursday. There were a total of 10 cakes since each tier on the large cake had two 2" cakes to make them an exact 4 inches in height once stacked. That was a total of 7.5 hours bake time. I leveled and filled them on Friday. Made buttercream Friday and frosted and piped the scrolls and borders on that day. Nine and a half hours for the work on Friday. I trimmed and placed the flowers Saturday morning at the reception site. I assembled the tiered cake completely at home and delivered it that way. Very nerve-wrecking! But I was confident since I used my cut pillars for support that the cake was level and I inserted a total of 4 skewers, sharpened to pierce through the layers of cake boards, that I wouldn't come apart. It was extremely heavy, probably close to 50 pounds of cake on my lap! I got to use my new silver hammered cake stand also.

The cake tasted great too (as I was a guest to the wedding, I actually got to have a slice, which is rare). The best part of the day was hearing the bride, Angela across the room "Oh my gosh, I LOVE the cake!" I didn't send her any pictures of the cake before the wedding, her reaction was priceless and made me tear up!


 Final set up. The globs of buttercream and doilies on the cake aren't the most attractive but I didn't want to stick potentially pesticide ridden flowers directly onto the frosting.


 My final cake sketch.


The florist told me to put the roses in hot water overnight to get the blooms to open. I didn't mind having flowers in vases to wake up to the next morning either ;)


The final set up at the reception.


Sheet cake 2

Sheet cake 1


I was also in charge of setting up/styling their table. 


Their first cut.
Just little old me, serving up cake!

Monday, September 16, 2013

Bridal Shower Birdcage


Inspiration for this cake came from Pinterest. It is a birdcage bridal shower cake.

The cake was made with my wonder mold pan which has the dimensions of 8" diameter and 5" tall. To add some height and create more of the birdcage shape, I used an 8x3" round. The cakes were vanilla and I  torted both cakes and added a raspberry filling and covered them in sweet buttercream. The wonder mold was set on a cakeboard and I used dowels in the round to support the top cake.


I made the flowers a few days ahead of time, just large and small swirl flowers, to give them time to harden.


I hand cut the birds from fondant and handpainted the details on with food coloring. Then I made the birdcage handle from fondant and allowed them to harden for a few days also.


I tied a small string of baker's twine to a toothpick, centered it and stuck it in the top of the cake and ran it down the sides, lightly pressing it into the buttercream to divide out the lines for the birdcage.


The finished cake I set on my porcelain cake stand.

Saturday, July 13, 2013

Things might get cheesy...

...when you make a rat cake?

I tried a new vanilla cake recipe since the last one somebody said tasted a bit "cornbread-y". I think it was the buttermilk. This cake is sweet! And light! And fluffy! I like it better and so do my taste-testers.


White Cake
2 cups baker's sugar
1 cup (2 sticks) room temp butter
1 tbsp + 1 tsp clear vanilla
4 eggs
3 cups cake flour
1 tbsp + 1 tsp baking powder
1 cup milk
pinch of salt

Preheat oven to 350 degrees, grease and flour 2 8" rounds. Cut parchment to size
Cream together butter and sugar until light and fluffy. Add vanilla. Beat in eggs one at a time. In a separate bowl, whisk together flour, baking powder and salt. Add flour mixture one cup at a time. Beat until combined. Slowly add milk. Divide batter between pans and bake for 35-40 minutes. Cool on cooling rack 20 minutes in pan before removing.


Buttercream
6 cups powdered sugar
2 cups (4 sticks) room temp butter
4 tsp clear vanilla
4 tbsp heavy whipping cream

Cream together butter and sugar, beat on medium for 3 minutes. Add vanilla until just combined. Add heavy whipping cream and beat until light and fluffy.


Saturday, May 18, 2013

Logan's Graduation


Chocolate Cake 
2 1/2 cups sugar
1 1/2 cups butter, room temp
2 tsp vanilla
6 eggs
4 cups cake flour, sifted
2 tsp baking soda
1 tsp salt
2 cup milk
12 oz semi sweet chocolate baking bars, melted and cooled

In mixing bowl combine sugar, butter and vanilla. Add eggs and beat for 1 minute. Add melted chocolate. Add flour, baking soda and salt. Gradually add milk. Prep 11x15" sheet pan with Wilton cake release. Bake for 55-60 minutes at 325 degrees. I rotate my pan after 20 minutes to ensure even baking. Cool to room temp on wire rack then move to fridge to chill before frosting.


Buttercream Frosting
6 cups powdered sugar
4 sticks (2 cups) room temperature butter
2 tsp clear vanilla extract
2-4 tbsp heavy whipping cream
food coloring as needed

Mix together butter and sugar in stand mixer for 3 minutes on medium. Add vanilla and cream and beat for another minute. Divide and color. I used Delphinium Blue and Royal Blue mixed and Orange and Copper mixed to get the shades I used.

Buttercream transfer for the high school mascot. 

Saturday, April 20, 2013

How-to: Buttercream Transfers

Buttercream transfers are an easy way to add a design to your cakes by using an illustration, cartoon or coloring page and coloring them in with frosting. I use a full butter frosting as opposed to a butter/shortening mix because the butter freezes better and is like whipped ice cream. Make the frosting and divide and color as needed.

Buttercream Frosting
6 cups powdered sugar
4 sticks (2 cups) room temperature butter
4 tsp clear vanilla extract
4 tbsp heavy whipping cream
food coloring as needed.

Cream together butter and sugar. Beat for about 3 minutes until light and fluffy. Add vanilla, beat for 1 minute. Add heavy whipping cream, beat for 3 minutes, until fluffy.


First thing you need is to draw or print out your designs. You have to use a mirrored image of what you want on the cake because you flip it over.


Next cut out wax paper squares to fit over the image allowing 1-1.5 inches around image to handle the paper and apply tape.


Find some kind of flat surface like a cutting board, sheet pan, or in my case, 8" rounds, that fit into your freezer. I like that the pans are metal and conduct heat so they stay cooler longer while you pipe on them. I put my pans in the freezer first so when I start piping it doesn't move. Tape the image to the flat surface then tape the wax paper over it. 


So this part I missed, but you want to start with what is in the foreground of the image and pipe it first. Next do the outlines and fill in with frosting. Use a toothpick to maneuver the frosting into any tight corners. Go around the perimeter with the same frosting color as the background of your cake (prevents color bleeds). Then apply another layer of just the back ground color over the entire image. Place it in the freezer for 5 minutes. Pull it out and use a Viva paper towel (it doesn't have texture or inks) to smooth it level. Just place the paper towel over the frosting and smooth gently with your hand or a smoothing tool.  Place back in freezer for 15-20 minutes until hard. 


After the frosting hardens, flip the image onto the cake. If it is pliable, put it back in the freezer or else it won't stay on the cake and will stick to the paper.  Slowly peel off the wax paper.


At this point you can pipe any embellishments, add writing and pipe borders.